Swift 알고리즘 및 언어공부
49. 두 개 뽑아서 더하기
1 numbers 배열에 숫자들을 두 개씩 더해서 빈 배열에 넣는다
2 Set은 중복을 허용하지 않는다는 특성을 이용해서 중복 제거
3 중복제거 후 array로 변환해서 정렬한 후 리턴
import Foundation

func solution(_ numbers:[Int]) -> [Int] {
    var result:[Int] = []
    var sum:Int = 0

    for i in 0..<numbers.count {
        for j in i+1..<numbers.count {
            sum = numbers[i] + numbers[j]
            result.append(sum)
        }
    }
    let removedDuplicate:Set = Set(result)
    return Array(removedDuplicate).sorted()
}
원래 Set 타입으로 바꿔주기 전에 result 배열을 정렬했었는데, 그렇게 하니까 타입이 바뀌면서 정렬도 해제(?) 됐었다.
그래서 마지막에 정렬해 주는 것으로 고쳤음! 주의하자ㅏ
아 그리고 다른 사람 코드 중에서 마지막 return 처리를
return Array(Set(arr)).sorted()이렇게 하신 분이 있었는데 나처럼 굳이 변수를 만들어주지 않아도 간단하게 Set함수 사용할 수 있다!
나 자신.. 굳이 새로운 변수 만들기 그만...
50. 가장 가까운 같은 글자
문제가 너무 길다...
너무 헷갈렸다..
1 i는 고정해 두고, num값을 계속 -1 하면서 비교해 주기
2 비교해 주다가 같은 단어면 i - num 해서 몇 번째에 같은 글자가 있는지 result에 append
3 같은 단어가 없으면 -1 append 해주기
import Foundation

func solution(_ s:String) -> [Int] {
    var result:[Int] = []
    var sArr = s.map{ String($0) }

    for i in 0 ..< sArr.count {
        var isExist = false
        var num = i

        while (num > 0) {
            num -= 1
            if sArr[num] == sArr[i] {
                result.append(i - num)
                isExist = true
                break
            }
        }
        if isExist == false { result.append(-1) }
    }
    return result
}
어제 과제를 이어서 해보자면..
구조체 만들어서 사용해 봤는데 새로운 셀 추가하면 다 사라지고 초기화됨..
그게 문제가 아니었나 봄 ㅋㅋㅋㅋ ㅜㅜㅜㅠㅠ
override func prepareForReuse() {
super.prepareForReuse()
myLabel.attributedText = nil
}
이게 문제였던 것 같은데,, 내가 오류를 해결하려고 prepareForReuse()를 넣었던 게, 문제였던 것 같음..
근데 이걸 지워도 이상함..
이렇게 취소선이 한 칸씩 밀리고, switch도 false로 바뀜..
그래서
https://nlestory.tistory.com/m/77
[UIKit] 테이블뷰 UISwitch의 isOn 속성 유지, 테이블뷰 셀 내부의 스위치 클릭 이벤트
셀이 재사용되면서 속성이 변경되는 오류 → prepareForReuse() 사용 (재사용 가능한 셀을 준비하는 메소드) override func awakeFromNib() { super.awakeFromNib() // print("TableViewCellOrder -awakeFromNib") //이미지 원으로
nlestory.tistory.com
이 방법 사용해 보겠음
오 이렇게 스위치 값 저장해 주니까 스위치는 됐다!
근데 문제는 취소선이 초기화됨 ㅋ
override func prepareForReuse() {
super.prepareForReuse()
myLabel.attributedText = nil
}
위 사이트에서 이걸 사용해 주는데 내가 nil 값으로 설정해 놔서 사ㅏ라지는 듯?
그래서 제거해 봤는데 잘 나오지만, 셀 추가 시 취소선이 한 칸씩 밀림...
이것저것 시도해 봤는데 결국 방법을 찾지 못했다!!!
그래서 일단 레벨 3 구현하기..
삭제하는 기능은 검색하면 쉽게 알 수 있다! (참고 사이트)

editingStyle 사용하면 간단하게 구현할 수 있음!
계속 취소선이 밀리는 것 때문에 고민을 했는데, 잘 되다가 추가하기로 셀을 추가하면 취소선이 이상해지는 것을 보고,
reloadData() 때문에 취소선이 이상해지는 거 아닌가? 생각했다.
그래서 reloadData()에 대해서 알아봤다. (내일 공부한 것을 더 자세히 적을 것)
여하튼, reloadData()가 tableView에서 전체 셀과 섹션을 업데이트해주는 기능이라서 취소선이 에러가 난 것 같다.
추가하는 부분만 업데이트하면 취소선에는 영향이 안 갈 거라고 생각했다!
그래서 insertRows를 사용하기로 함 (참고사이트)
insertRows 도 내일 TIL에서 더 자세하게 공부할 예정이다.
여하튼 이렇게 해주니 정상적으로 작동하는 것을 볼 수 있었다!
스와이프 하면 삭제도 가능
그래도 이렇게 필수구현 부분은 완성했다...
코드는 밑에
ViewController
import UIKit
class ViewController: UIViewController, UITableViewDelegate, UITableViewDataSource, SwitchOnDelegate {
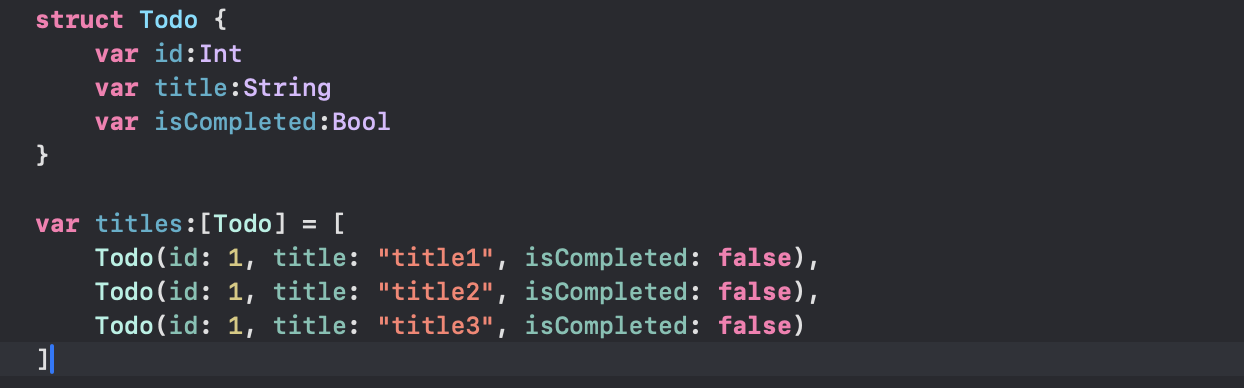
//데이터 저장을 위한 구조체 생성
struct Todo {
var id:Int
var title:String
var isCompleted:Bool
}
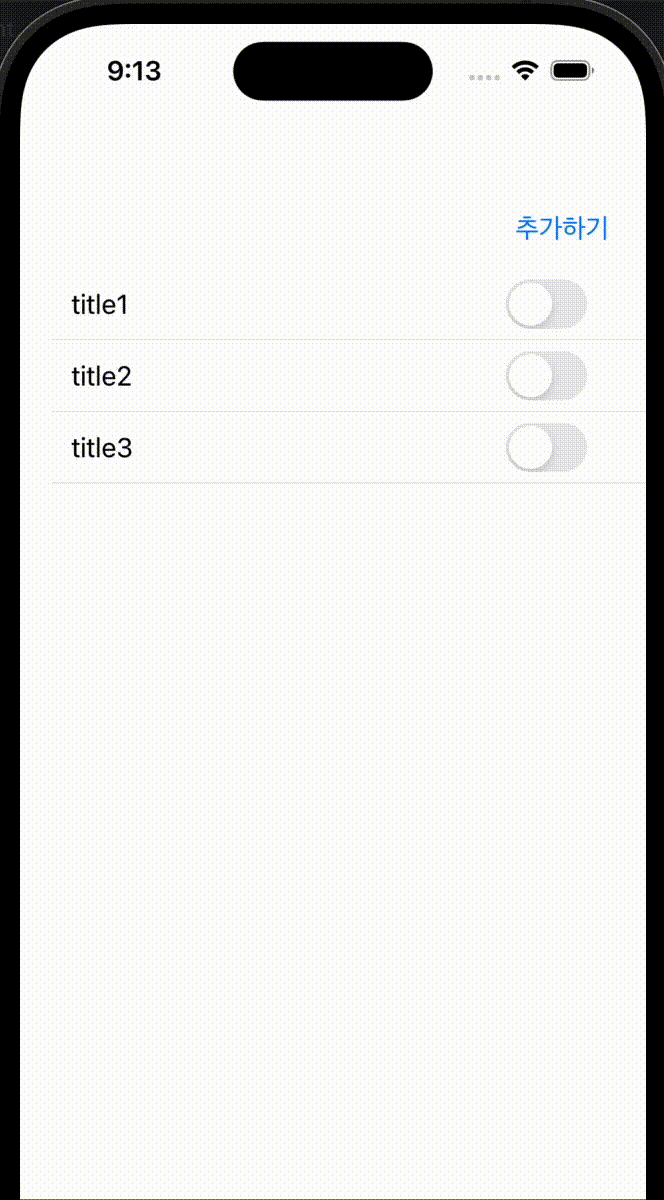
var titles:[Todo] = [
Todo(id: 1, title: "title1", isCompleted: false),
Todo(id: 1, title: "title2", isCompleted: false),
Todo(id: 1, title: "title3", isCompleted: false)
]
//초기 tableView 구성
@IBOutlet weak var tableView: UITableView!
@IBOutlet weak var addButton: UIButton!
// 스위치 여부 저장
func switchChange(index: Int, switchIs: Bool) {
titles[index].isCompleted = switchIs
}
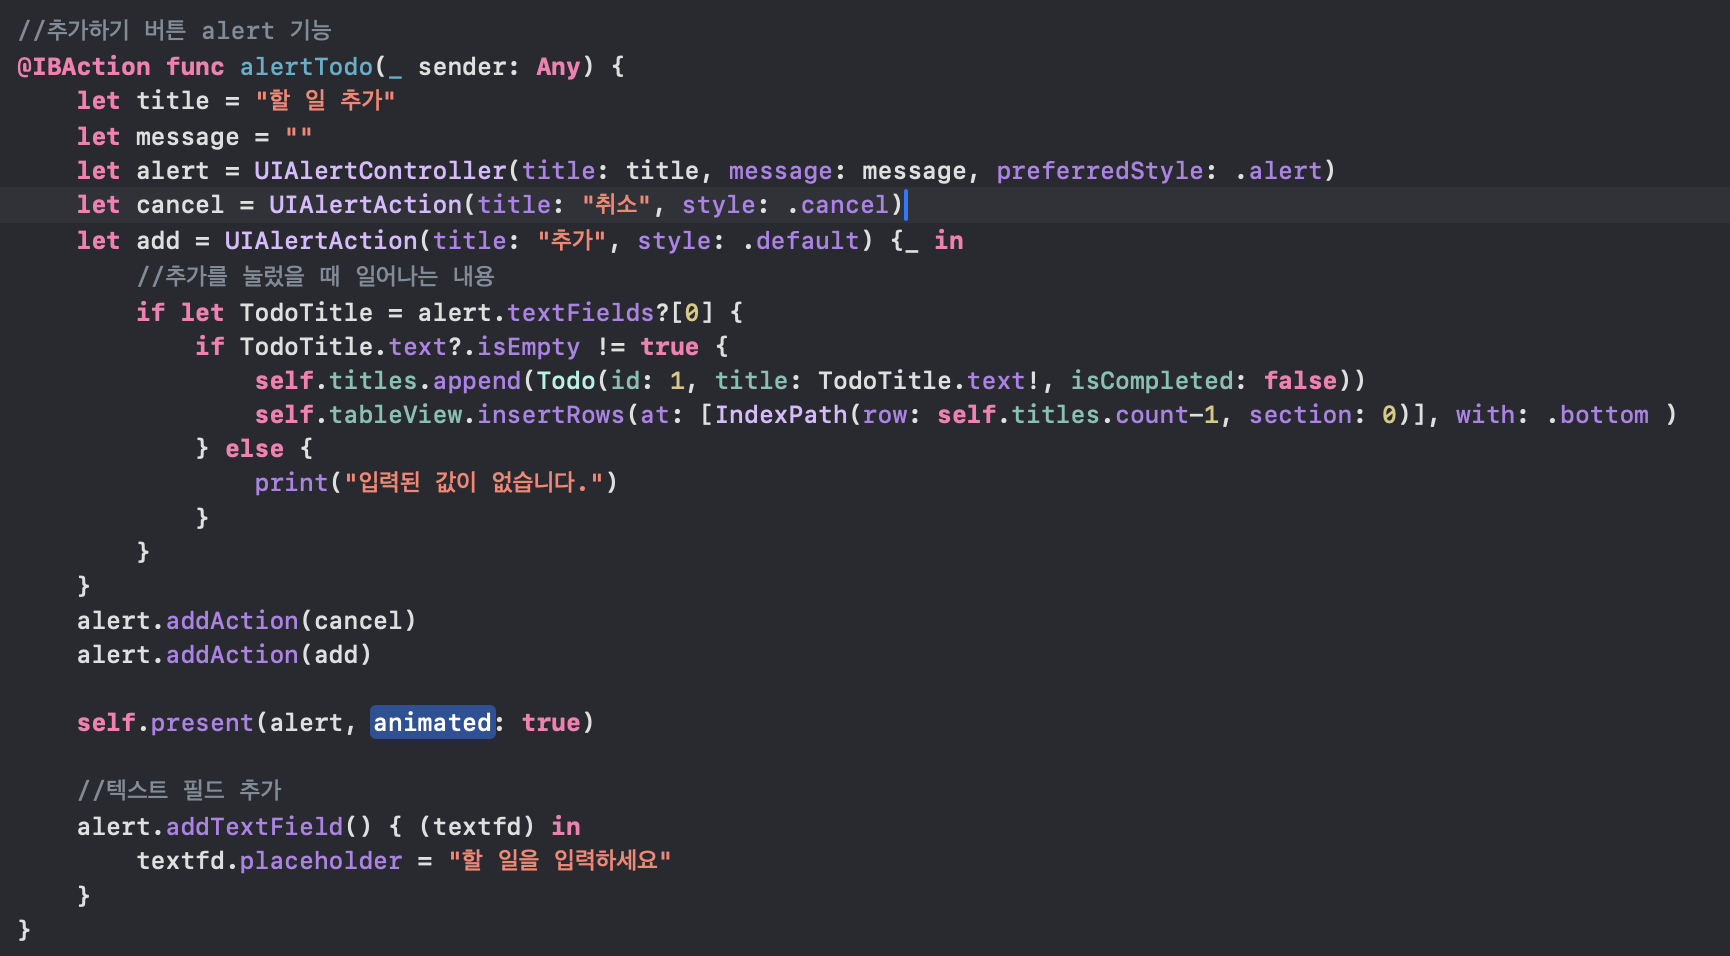
//추가하기 버튼 alert 기능
@IBAction func alertTodo(_ sender: Any) {
let title = "할 일 추가"
let message = ""
let alert = UIAlertController(title: title, message: message, preferredStyle: .alert)
let cancel = UIAlertAction(title: "취소", style: .cancel)
let add = UIAlertAction(title: "추가", style: .default) {_ in
//추가를 눌렀을 때 일어나는 내용
if let TodoTitle = alert.textFields?[0] {
if TodoTitle.text?.isEmpty != true {
self.titles.append(Todo(id: 1, title: TodoTitle.text!, isCompleted: false))
self.tableView.insertRows(at: [IndexPath(row: self.titles.count-1, section: 0)], with: .bottom )
} else {
print("입력된 값이 없습니다.")
}
}
}
alert.addAction(cancel)
alert.addAction(add)
self.present(alert, animated: true)
//텍스트 필드 추가
alert.addTextField() { (textfd) in
textfd.placeholder = "할 일을 입력하세요"
}
}
//테이블뷰 관련 함수들
func tableView(_ tableView: UITableView, numberOfRowsInSection section: Int) -> Int {
return titles.count
}
func tableView(_ tableView: UITableView, cellForRowAt indexPath: IndexPath) -> UITableViewCell {
let cell = tableView.dequeueReusableCell(withIdentifier: "myCell", for: indexPath) as! myTableViewCell
let target = titles[indexPath.row]
cell.mySwitch.isOn = target.isCompleted
cell.myLabel.text = target.title
cell.orderCellIndex = indexPath.row
cell.switchOnDelegate = self
return cell
}
func tableView(_ tableView: UITableView, didSelectRowAt indexPath: IndexPath) {
tableView.deselectRow(at: indexPath, animated: true)
}
//삭제 기능
func tableView(_ tableView: UITableView, commit editingStyle: UITableViewCell.EditingStyle, forRowAt indexPath: IndexPath) {
if editingStyle == .delete {
titles.remove(at: indexPath.row)
tableView.deleteRows(at: [indexPath], with: .fade)
} else if editingStyle == .insert {
}
}
override func viewDidLoad() {
super.viewDidLoad()
tableView.delegate = self
tableView.dataSource = self
//추가하기 버튼
addButton.setTitle("추가하기", for: .normal)
}
}
myTableViewCell
import UIKit
class myTableViewCell: UITableViewCell {
@IBOutlet weak var myLabel: UILabel!
@IBOutlet weak var mySwitch: UISwitch!
var switchOnDelegate: SwitchOnDelegate?
var orderCellIndex:Int = 0
@IBAction func completeTodo(_ sender: UISwitch) {
changeStrikeThrough()
}
func changeStrikeThrough() {
if mySwitch.isOn {
myLabel.attributedText = myLabel.text?.strikeThrough()
switchOnDelegate?.switchChange(index: orderCellIndex, switchIs: true)
} else {
switchOnDelegate?.switchChange(index: orderCellIndex, switchIs: false)
myLabel.attributedText = myLabel.text?.removestrikeThrough()
}
}
override func awakeFromNib() {
super.awakeFromNib()
// Initialization code
}
override func setSelected(_ selected: Bool, animated: Bool) {
super.setSelected(selected, animated: animated)
}
override func prepareForReuse() {
super.prepareForReuse()
mySwitch.isOn = false
}
}
protocol SwitchOnDelegate {
func switchChange(index:Int, switchIs: Bool)
}
//취소선
extension String {
//취소선 생성
func strikeThrough() -> NSAttributedString {
let attributeString = NSMutableAttributedString(string: self)
attributeString.addAttribute(NSAttributedString.Key.strikethroughStyle, value: NSUnderlineStyle.single.rawValue, range: NSMakeRange(0, attributeString.length))
return attributeString
}
//취소선 지우기
func removestrikeThrough() -> NSAttributedString {
let attributeString = NSMutableAttributedString(string: self)
attributeString.removeAttribute(NSAttributedString.Key.strikethroughStyle, range: NSMakeRange(0, attributeString.length))
return attributeString
}
}
휴 완성 못하면 어쩌지 걱정했는데 그래도 해결해서 다행이다 !